The existence of laser engraving has drastically transformed the common customization of items, with tumblers being a more regular item. A laser engraving machine can alter this simple tumbler into a masterpiece, be it for brand identity of a business, an appreciative gift, or a brainchild. But there is a lot to think about in terms of machine, material, techniques, etc., involved in the inspiration of getting started! Detailing provides deep intellectual depth about laser engraving on tumblers, starting from the necessity for a good machine to mastery of the engraving process. Professional insights and tips abound for you, whether you are the owner of a small business, a hobbyist, or even just plain curious. Get ready for a new world of laser engraving, the tug toward a historical art to technical brilliance!
Introduction to Laser Engraving
Laser engraving has become a dominant method that allows etching of high precision with a laser beam on a variety of surfaces to paint designs, texts, or patterns. This operation consists of levelling the top of the material to make a lasting imprint. Its use is frequently found in the case of materials such as stainless steel, glass, wood, and coated metals. The advantages of laser engraving are that it is a wonderfully accurate method, fast, and capable of producing detailed and professional-quality results. It has found its way into the market due to the very low setting up needed and high versatility, where it is extensively used for customizing items like tumblers providing infinite options for personal and brand marking.
What is Laser Engraving?
Laser engraving is an exact and rapid way of making designs or writing on different materials with a strong beam of light. This method does not touch the material; it just takes off a thin layer of the surface which is permanent and very detailed. Besides, the use of laser engraving is much more on metals, glass, wood, acrylic, and even leather, the process is famous for its flexibility in various industries such as manufacturing, design, and personalization. The accuracy and speed of this technique are so remarkable that it is used for producing custom products, serial numbers, and logos as well as for making intricate artwork. The very fact that it has the ability to produce high-quality results with almost no material waste has given laser engraving the status of being the preferred method for both professional and creative uses.
Benefits of Using Laser Engraving for Tumblers
- Durability:
Laser engraving produces a mark that is permanently in place and that is naturally of high resistance to fading, peeling and scratching, thus guaranteeing the design will accompany the tumbler throughout its life. - Customization:
It gives to the designer full freedom to work with his creativity and the result is nothing short of being a masterpiece t o the user’s taste done in tumblers with names, logos or intricate patterns. - Professional Appearance:
The neat and dazzling finish of laser engraving impart an upscale and professional look to tumblers. - Eco-Friendly:
The technique is extremely efficient in producing very little waste and not using any toxic materials thus it is an eco-friendly option. - Versatility:
Laser engraving technique is effective on diverse surfaces such as stainless steel, powder-coated substrates, and even glass, thus offering a wide choice of tumbler styles to be engraved.
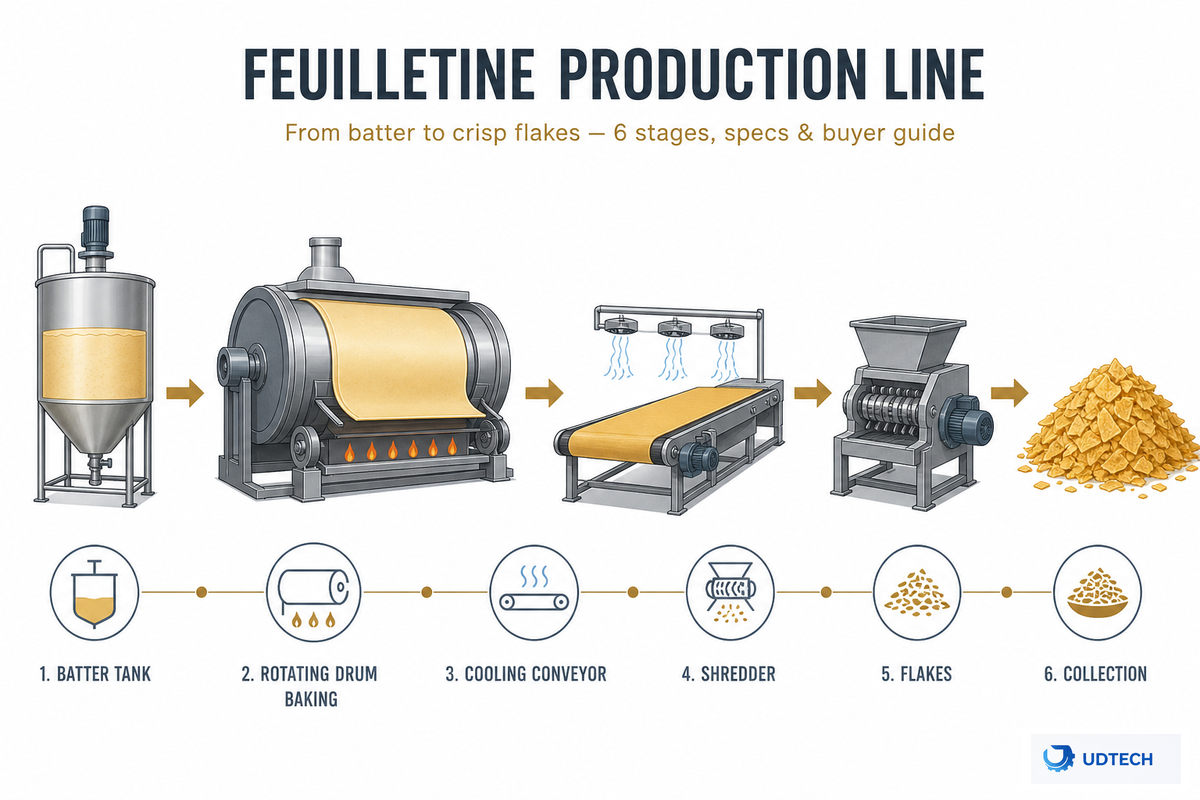
Overview of the Laser Engraving Process
Laser engraving is an incredible and efficient method that uses highly concentrated laser beams to translate designs, texts, or patterns into the surface of the material, with the procedure beginning with a digital sampling of owned software that normally controls the laser engraving machine. Operations are controlled from this design, while the operator discusses particular material preferences such as speed, power, and resolution. While working, the beam works by first heating up very intensely then vaporizes the surface material only in that area of the beam path. Thus the engraving will not also disturb other parts of the tumbler. The whole process underscores great accuracy and consistency, even for the most complex details or repetitive works.
Laser engraving remains the best option on the market since it can produce permanent and highly defined results by using neither dyes nor ink, thus, being highly durable and ecologically friendly. It is also multifunctional and can be applied in a very precise manner on different types of materials making it a preferred option not only for businesses but also for private customers.
Types of Laser Engraving Machines
Laser engraving machines include CO2, Fiber, Diode, and UV laser engravers. Below is a concise summary of their key points and parameters:
Diode Laser Engravers
Diode laser engravers have been acknowledged for their portability and low price which makes them very appealing and suitable to be used by amateurs and for little-scale projects. They are primarily used for engraving on materials such as wood, leather, and particular plastics, although, at the same time, they offer lower speeds and power than other laser types. One of the frequently asked questions about diode laser engravers is “Do they fit for professional use?”. The answer is while diode lasers can create elaborate and stunning engravings, slower speed and restricted material acceptance compared to CO2 or fiber lasers, often, make them less appropriate for high-volume industrial applications. Nevertheless, they give a choice, an effective and cost-efficient solution, for specific projects, personal crafts, or small businesses.
CO2 Laser Engravers
CO2 laser engravers are all-in-one machines with many applications, hence the reason they are the main tool in the shop and industry alike. Their capping and engraving versatility goes beyond good to outstanding; even materials like wood, acrylic, glass, leather, etc. can easily be processed. The productivity potential of these machines is huge due to their high speed, precision, and performance consistency. Then again, CO2 lasers have higher costs than diode lasers but their durability and better features make them top picks among companies wanting worthwhile only the most efficient and perfect output.
Fiber Laser Engravers
Fiber laser engravers, being state-of-the-art machines, are the ones that rely on fiber optic cables and a seed laser to create an amplified and accurate laser beam. This way of working makes the devices perfect for carving metals like stainless steel, aluminum, gold, and titanium; hence, they are widely used in industries like jewelry making, aerospace, and automotive sectors. The marking of plastics and other non-metallic materials with special coatings can also be done very effectively by these lasers. Furthermore, fibers have a greater lifespan, consume less power, and have extremely low maintenance requirements compared to CO2 lasers, due to their being solid-state devices.
The efficiency and precision of fiber laser engravers come from their high peak power, exceptional beam quality, and the ability to focus the laser on very small areas. Thus, very fine engravings are made and marking done with almost no heat-affected zones. Moreover, their operational costs are low and their speed is high; hence, fiber laser engravers can be considered as an excellent choice for industries that need high-quality markings in large volumes.
Materials Suitable for Laser Engraving Tumblers
Different materials can Laser engraving tumblers performed very efficiently. The most widely used material are stainless steel, powder-coated metals, aluminum, and some plastics. The engraving of these materials is precise and very durable thanks to smooth surfaces created from them. Compatibility of the material with the laser engraver should be checked beforehand to get the best results and keep the process efficient.
Stainless Steel Tumblers
Stainless steel cups are the most important competition for laser engravings for their ruggedness, attractiveness, and laser technology ease of use. Besides, tumblers like these are totally resistant to rust and corrosion which would damage the appearance of the engravings. Engraving on stainless steel gives more a corporate and contemporary look, as is commonly favored for personalized gifts, promotional materials, and cases of branding.
Selection of laser settings is vital when working with stainless steel tumblers to maximize your returns. Fiber lasers are the best choice for engraving stainless steel because they give accurate, rapid markings at a reasonable cost. Furthermore, laser marking on the stainless steel mugs can be an incentive for all types of personalized mugs not only for weddings and corporate events but for everyday uses, suggesting a wider sphere of application. According to present facts, with elaborate surface conditioning and proper laser delivery, engravers can generate very detailed and long-standing decorations on the products in high demand.
Powder-Coated Metals
Laser engraving tumblers made of powder-coated metals are an excellent and very attractive option because of the durable and vibrant finish. The powder coating forms a smooth colored surface that when laser is applied to it, forms a very clear and precise design due to the sharp contrast created, thus the non-removal of coating at all points. This material is perfect for custom logos, texts, or very complicated patterns which make it a very common choice for personalized products. The durability of the coating further allows the engraved designs to retain their attractiveness even after the full wear and tear of daily usage. The engraving of powder-coated metals entails a process of very meticulous laser settings adjustment in order to get clean and professional results in the end.
Glass Tumblers
Glass tumblers are a fantastic material when it comes to laser engraving. The clean look is trendy and modern for any personalization added to it. The blissfully smooth surface of this particular glass makes this process of engraving quite successful because engraved marks of high intricacy can easily be made on it when desired for an engraved logo; name; or even a decorative embellishment. Low-powered lasers are generally used, and a cracking or breakage of glass is avoided. Furthermore, professional engraving yields a frosted appearance on the glass where all the work is done. These are some common uses, namely massive promotions, custom gifts, and branding. Additionally, using higher-quality glass would mean that these engravings remain intact in all their vividness, beauty, and appearance for many years to come.
Step-by-Step Guide to Engraving Tumblers
1. Choose the Right Tumbler
Select a tumbler with high quality that is made from tough and sturdy materials such as glass or stainless steel, on the basis of your preferred finish.
2. Prepare the Design
Make the design or upload your design into the laser engraving software. Make sure the design is within the size of the tumbler.
3. Set Up the Laser Engraver
Change the laser engraver settings according to the material used for engraving. For glass, it is better to use low power settings as it is a delicate surface.
4. Secure the Tumbler
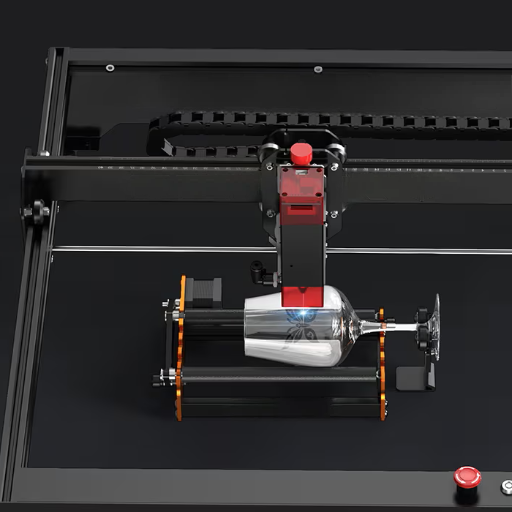
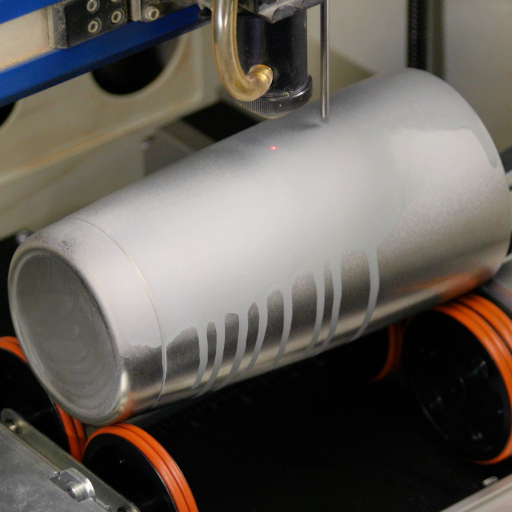
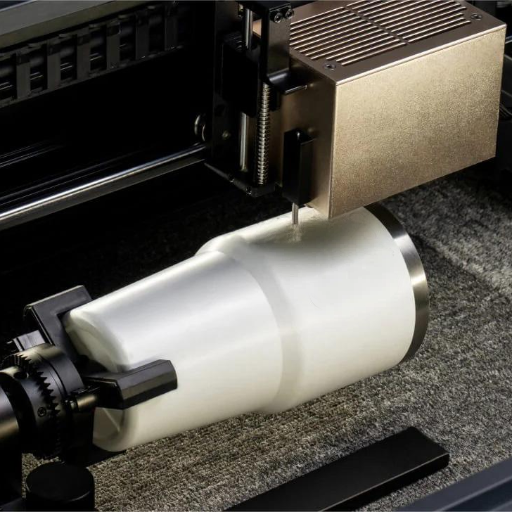
Using a rotary attachment or fixtures, keep the tumbler secured in position which will ensure that there is no movement during the engraving process.
5. Test on a Sample
Perform a test engraving on a corresponding material to get the alignment and settings right.
6. Engrave the Tumbler
Proceed with the engraving but keep monitoring it closely to get the required depth and clarity.
7. Clean the Tumbler
After the engraving is done, clean the tumbler to remove any dust or residue left by the process, and check the final result.
If you do these steps one by one, you will be able to make exactly really professional engravings on tumblers!
Preparing Your Tumbler for Engraving
To get your tumbler ready for engraving, begin with washing it completely with soap and water, a procedure meant to keep dirt, oil, and residue away. Once dry the tumbler properly to avoid witnessing moisture affecting the engraving quality during the process. With a coated tumbler, then, check the need to strip the coating for better engraving results. The tumbler should be held right in place with the rotary attachment or clamps to avoid moving around in any case. In case guidance is needed, set the area marking to a fine level for better alignment during a continuous process, and then these are some basic steps toward a clean and precise engraving.
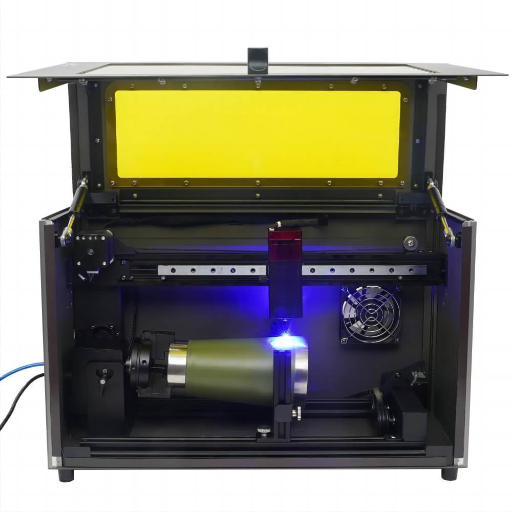
Setting Up Your Laser Engraving Machine
First of all, place the machine on an absolutely smooth and even surface so it remains safe and giving highly accurate results. Moreover, connect it to the best available power source and—using either the right cable or wirelessly depending on the model—connecting the machinery up to your desktop or laptop. Next, make sure that the software or driver required to operate the machine are compatible with your computer. Align the laser as per manufacturer’s instructions so that it coincides exactly with what you want engraved. Focus the laser depending upon the thickness of the material in order to get the best engraving results. Finally, try doing a test run on a small piece of a given material that matches your project in order to test the alignment and engraving settings prior to frying some important project. An amateur might fail to appreciate the details of such setups, unsure what will produce stupendous work and idiotic waste.
Executing the Engraving Process
In order to obtain top performance, all precautions and best techniques need to be closely followed while processing the engraving. The material should be carried in a favorable manner on the platform with enough rigidity and accurate alignment in accordance with the design facility require. Next, ensure that the laser’s focus and power settings have concomitantly been set in accordance with the correct specifications of the material. When everything has been prepared and put in place, the software allows you to engage right away. Devote your full attention to the engraving. Watch over the machine operation very carefully, so you can identify and correct any mishaps and deviations.
Set-up work is essential when you are doing laser engraving, primarily to ensure precision. It is also fundamental, because it prevents damage to both the material and equipment, therefore saving time by avoiding rework after damage. On the contrary, if other than a harness or incorrect settings, an inadvertent misalignment occurs, this might mean low-quality quality engraving that might also give rise to equipment issues. However, yet, align your machine with commensurate measures ahead of time, calibrate and run the relevant tests; users can achieve fair uniform engraving that will be unmatched to anything a professional could have ever produced.
Tips for Achieving High-Quality Engraving Results
- Choose the Right Material
– Ensure the proper material to be engraved by laser. Different materials such as wood, acrylic and metals require different settings to get the best results. - Calibrate Your Laser Machine
– Keep an eye on and set parameters for focus, energy and speed, with material in place, on a regular basis. When calibrated correctly, precision and reproducibility are guaranteed. - Clean the Lens and Mirrors
– Debris, which accumulate over time on the lens and mirrors, can have a backbreaking influence on the precision and power of the laser. This must be cleaned regularly to guarantee the quality and accuracy of your engraving. - Perform Test Runs
– Do test runs on waste or material that is almost the same before the final engraving is done. This practice helps to find the settings that are needed to be adjusted for getting the desired outcome. - Optimize Your Design Files
– Prepare design files of high quality and with good preparation to get clean and sharp engraving details. Complex or pixelated designs are to be avoided as they may not get transferred well in the engraving process.
Choosing the Right Settings
Selecting an appropriate setup of the engraving work is among the most crucial steps toward achieving the expected result. However, much focus should be put on three main aspects:
– Whatever power setting changes one may like is dependent on the material that needs to be engraved. Delicate materials are engraved with lower power, but for hard and thicker surfaces, we must use some power.
– The engraving speed is set according to the level of accuracy required. Slower speeds render more fine detail but might take a longer time to finish.
– The resolution selected affects the quality of the cut. Higher resolutions work well with intricate designs, while lower resolutions fit the simple patterns.
Test different settings on some scrap material to learn what will be the right combination to expect to provide excellent results before embarking on their actual projects.
Cleaning and Maintenance for Consistent Quality
The proper cleaning and maintenance of laser engraving machines are very important to keep the machines working the same way they did when they were new and also prolong their working life. Below are the major steps and some good practices for having your machine in great shape.
- Regularly, Clean the Lenses and Mirrors – During the working period, the lenses and mirrors can gather dust, dirt, or smoke and then these substances can become the main cause of problems with the laser beam in terms of accuracy and power. Weekly or sometimes more frequently use a special cleaning solution and a lint-free cloth to clean these parts.
- Inspect and Lubricate Moving Parts – Make it a point that the rails, belts, and every other part that moves are not only free from blocking substances and the right amount of lubrication is applied. This not only reduces the friction and hence the wear but it also leads to smoother movements and more precise engravings.
- The Debris Tray should be Emptied – Proactively, ash, dust and debris should be removed from the machine’s tray regularly to make sure it won’t get clogged and won’t overheat. After each project would be the best time to do it, because it would help maintain efficiency.
- Inspections to the cooling system – should be a must lest your equipment uses water for chilling. It is important to examine the water level and quality constantly. Water must be kept in control; it should be renewed cyclically so that chances of overheating and contamination are minimal. Clean the ventilation and coolers from time to time.
- Calibrate the Laser Beam – After being serviced, the laser beam is tooled. Calibration corrects the accuracy and reduces misalignments. Instructions from the manufacturer should be followed closely so that the laser beam is ideally aligned.
- Software and Firmware Update – Availability of new software/ firmware from the manufacturer is ruled reliable as channels that will highly enhance the performance of your machine.
Cleaning and maintenance practices followed consistently not only improve the quality of engraving but also reduce the time that would be spent due to repairs. Regular care also secures and trusts, so it is a good investment for professionals as well as hobbyists.
Common Mistakes to Avoid
If one does not clean and keep the engraving machine properly, then its performance (will) botch, thereby delivering unsatisfactory quality outputs or damage in the end, which may take months or years to fully recover.
As for the case with incorrect control input -speed, power, or focus- the engravings would likely become misshaped or the material of the substrate to be mutilated.
What generates dissatisfied results and, above all, damages the equipment is using materials that do not prove compatible to the machine. Always make sure that the material is suitable for your equipment.
Lack of protective means or the negligent disregard for the necessity for ventilation could entail serious full-time health risks being taken. Always stick to all safety instructions given by the manufacturer.
For the rest, calibration fades with color, meaning misaligned endless pieces of work and unreliable output. Calibration should apply as part of your work program.
To save yourself from all these common mistakes will bring your better results, increase the life-span of the engraver and also make sure that the operation remains safe.
Reference Sources
-
Laser Etching Machines for Cups: Precision, Customization, and Technological Innovation in Modern Engraving – This paper explores the advancements in laser etching technology for drinkware, including tumblers, focusing on precision and customization.
-
Design and Fabrication of Laser Engraving Machine – A detailed study on the design and development of laser engraving machines, highlighting their applications in handcraft and gift customization.
-
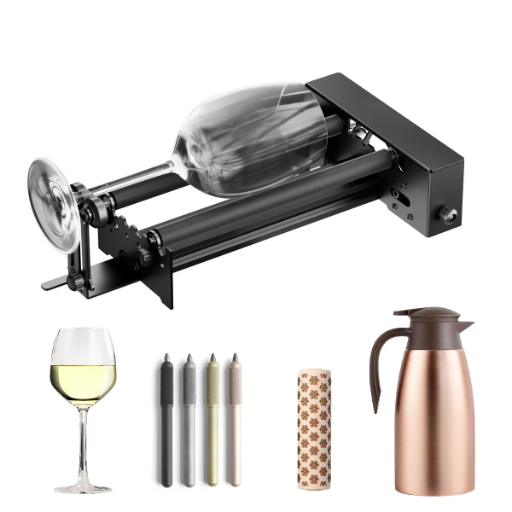
The Development of Rotary Fixture on Laser Engraver Machine – Research on the use of rotary fixtures in laser engraving machines, which are essential for engraving cylindrical objects like tumblers.
- Top CNC Laser Marking Machine Manufacturer and Supplier in China
Frequently Asked Questions (FAQs)
How can I use a rotary roller, or 4-in-1 rotary to engrave a tumbler?
To engrave a tumbler, simply place it onto either the rotary roller or 4-in-1 rotary gadget so that while it spins correspondingly to the inside working area in the desktop laser engraver. Next, calibrate the rotary axis in your control software (LightBurn is a common application) as actually getting the correct diameter and circumference settings for wrapping around designs. Clamp the tumbler so it won’t move and run a series of trial passes to play around with the focus and power settings. For powder-coated or anodized aluminum tumblers, they can adjust speed and power until they get satisfactory contrast. This can be considered another option for stainless steel tumblers, or they could go in for laser marking spray or a stronger marking machine/fiber laser equipment for desk marking.
Is it possible for a desktop laser engraver to engrave metal tumblers and work with metal?
A desktop machine- either a diode laser or CO2- might, for the most part, mark powder-coated tumblers and aluminum, serial tags on coated tumblers, with a removed covering that gives the necessary contrast. Directly engraving on the bare stainless steel generally needs a higher-powered fiber/RF laser marking machine or a prepped surface with a marking spray. You have your choice for a deep, permanent manufacturer’s mark on any metal tumbler-darkening machine specifically for metal lasers or an RF/metal laser cutter.
What settings or software should beginners use for the beginner level laser engraving?
Prospective users are encouraged to begin with suggested presets specifically aimed at their material and wattage settings. For design import and the control of speed, power, and resolution, you can use a software like LightBurn software. Generally for powder coat finishes and anodizing, use lower power and higher speed, and then conduct a small test engrave on scrap materials. Practice the setting of the correct DPI for detailed designs, and finally, enable air assist to minimize scorching on the design when cutting. Most desktop laser engravers provide useful guidance and easy-to-follow tutorials to guide users on the safety aspects of starting off with the engraving process now.
If a tumbler is a canvas, what detail to work on: such as custom logos or personalized gifts?
For intricate designs to be made on tumblers, SVG files have to be used so as to give the vectors that sharp line art and the ability to scale them to the right fit into the engraving space. This will help to optimize paths and shorten the engraving time with LightBurn or any other software. When detailed etching is needed on stainless steel or anodized aluminum, the resolution needs to be heightened and the speed dropped, while changes in power settings must be kept in mind. A well-calibrated rotary roller ensures that everything is evenly engraved around; tumblers by Yeti follow the same path; a fine-tuning to power is crucial for a high-contrast effect on powder-coated tumblers to cleanly remove the coating without affecting the underlying metal.
What accessories and upgrades upgrade the results for laser engraving tumbler machines?
Mandatory equipment is highlighted by a rotary indexer or a 4-in-1 rotary braced for different-sized tumblers, an air assist for cutting, and a closed box or fume extractor for vented cutting. Enhancements can entail the option of a more powerful laser module (30W equivalent), dual lasers for faster work, or fiber/RF laser tube for marking of metals. Hence, calibration tools, a sturdy working space, and helpful software like LightBurn or its manufacturer’s help enhance workflow desired for custom gifts and small-business production.