Laser cutting technique is the way to go when it comes to producing not only flawless but also industrial and spectacular designs using acrylic and plexiglass. It is the most efficient and versatile option available. A painter, an artist, or a factory worker, whoever you are, learning the laser cutting of these materials will definitely be a ticket to unlimited creative ideas. This comprehensive guide will take you along the journey of laser cutting acrylic and plexiglass step by step: understanding their properties, the tools, the techniques, and tips for getting great results. It does not matter whether you are a beginner who will do his/her first project or an experienced designer who just wants to hone his/her skills, the article is meant to provide you the knowledge and the know-how to make your ideas come to life.
Understanding Acrylic and Plexiglass
💎
What Are Acrylic and Plexiglass?
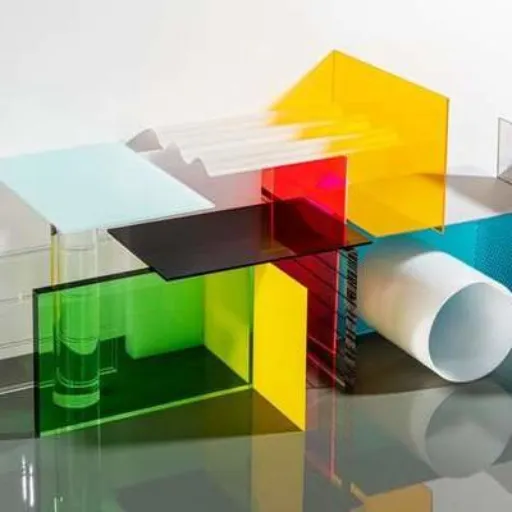
Acrylic and plexiglass can be considered as two different kinds of transparent plastic that have almost the same qualities like being light, durable, and clear, and hence their wide usage. The terms are mostly used interchangeably, but in fact, plexiglass is a trade name under which acrylic sheets are sold. The chemical PMMA is the one responsible for the properties of acrylic that made it the primary alternative for glass in the first place, strong and resistant to breaking. This, along with its availability in a vast palette of colors, thicknesses, and surface treatments, i.e., customization for whatever project it can be applied to such as signs, displays, architectural design, arts and crafts, etc., made acrylic a very convenient plastic. Moreover, manufacturing methods have become very sophisticated and one of the tools is laser cutting that has made acrylic more accessible and therefore user-friendly, hence, it is given the name of “a material of the future”.
Differences Between Acrylic and Plexiglass
Though Acrylic and Plexiglass have frequently been used interchangeably, some subtle differences do exist which demand attention. Plexiglass is a trademarked acrylate product, much like the word “Kleenex” that is predominantly used for all types of tissues. The two are both polymers of methyl methacrylate (PMMA) but the first one is a highly reputed product with quality control and durability, on the contrary, the latter one is an unnamed quantity.
In the property comparison of the two materials, the differences would be minor because of the small variations in the manufacturing processes and the formulations that result in the slight differences in such characteristics as flexibility, scratch resistance, and clarity among them. For example, Plexiglass is typically considered to have the best optical properties, thus, it is the most appropriate for very high transparency applications. In contrast, the general acrylic may have more colors and finishes that would be more suitable for custom projects. Both materials are light, weather-resistant, and can be easily cut or shaped, however, the final choice is usually made depending on the project specifications, budget, and aesthetic preferences.
Common Uses in Industries
Acrylic and polycarbonate materials have become indispensable in a myriad of industries thanks to their versatility andunique characteristics. Acrylic’s ability to remain clear and be molded into the most creative shapes is even a reason why it is widely used in advertising and signage. Retail displays, picture frames, and lighting fixtures are made with acrylic for its aesthetic appeal and light weight. Similarly, due to the high impact resistance of polycarbonate it is used rather than glass in applications like protective barriers in construction and automotive industry, roofing panels, and vehicle headlight covers. Both materials are also very much alive in the medical and aerospace industries where their strengths and transparency are sought-after qualities. According to the most recent search trend of “s” data, it has been noticed that the people’s interest in using these materials in eco-friendly products, such as reusable containers, and in eco-friendly building designs has increased, which is a reflection of the industry’s transition to more sustainable solutions.
Preparing for Laser Cutting

Selecting the Right Laser Cutter
Criteria for picking out the best laser cutter should always take into consideration such different aspects as the material to be worked on, power output and so on, which might be the main factors determining reduced waste and maximum efficiency, respectively. First, the material should be identified—some laser cutters are more effective on specific materials like acrylic, wood, or metal. Then, power output would be a determinant factor as wattage—high lasers for cutting thick materials and low for precision engraving—works tightly on the melting point in various applications.
But, you should also consider the size of your work area and the machine’s dimensions in relation to the size of your projects. According to the latest search trends of , there is growing interest in compact, user-friendly laser cutters in both professional and hobbyist sectors. The searches also indicate a need for laser cutters with more advanced software integration, hence providing smoother workflows, and compatibility with the latest design tools. Lastly, energy-efficient models should be given priority since they reflect the increasing consumer demand for eco- friendly solutions in the industry.
Selecting the Right Acrylic or Plexiglass
There are several factors that determine the proper acrylic or plexiglass for laser cutting projects like thickness, color, and finish that must be considered in order to achieve desired results. A recent analysis of the search trends has shown that more and more people are looking for materials which are multifunctional and very compatible with cutting technology. Among the materials, the transparent acrylics and the cast colors are very much in demand as they are not only easy to cut but also produce edges so perfect that it is almost impossible to recognize them against the extruded ones. Also, the eco-friendly and recycled acrylic sheets are more and more chosen because they are sustainable materials, which is exactly what the modern consumer trends are asking for. It is always wise to verify if the type of acrylic, you are planning to use, will meet both your design requirements and your equipment’s capabilities in regard to efficiency and quality.
Safety Precautions
Safety precautions that have to do with the use of acrylics should always be observed during the cutting operation to make it both safe and productive. It is highly recommended to use personal protective equipment (PPE) at all times, which includes goggles and gloves, to prevent and protect oneself from sharp edge injuries and cuts from tiny fragments during the cutting process. On that note, the workspace should always be well-ventilated especially if you are working with cutting or any other processes that tend to produce fumes; acrylic can yield toxic gasses when burnt. A fire extinguisher should always be around because of the high flammability of acrylic under certain circumstances. Proper maintenance of cutting machines as suggested by the latest data from ‘s search engine can also greatly minimize risks, since, as a dull blade or misalignment can cause an accident. Just make sure to check your machine manual and manufacturer specifications are met so that you comply with safety standards. It is good to practice these precautions not only for your own safety but also to ensure the quality of your projects as you will not have to do a redo.
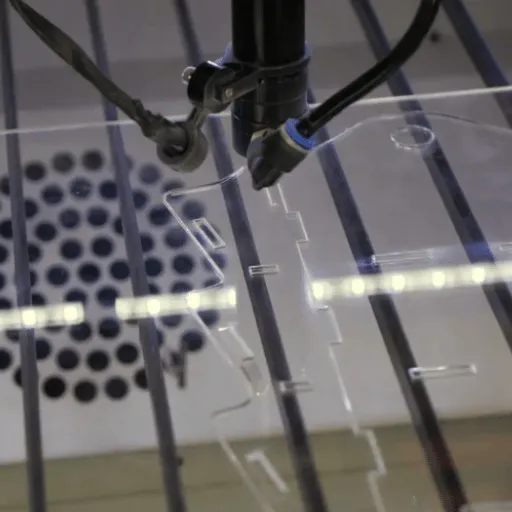
Step-by-Step Guide to Laser Cutting Acrylic and Plexiglass
1
Step 1: Designing Your Project
The initiation of the project design is characterized by a clear and well-thought-out plan. The first step in the digital design process is the use of vector graphics software such as Adobe Illustrator, CorelDRAW, or the free alternative Inkscape. These programs enable you to have very fine control over the shapes, lines, and dimensions of your design which in turn is very important for the accurate laser cutting procedure. Besides, the new information from ‘s search engine confirms that the focus on simplicity and scalability in your designs would indeed result in laser cutting efficiency and errors being greatly reduced. A common query at this point in the process is, “Which file formats are compatible with laser cutters?” . Well, the best part is that the vector files including . AI, . SVG, . DXF, and . PDF are mostly acceptable by the majority of laser cutters. Take care to check the specifications of your particular machine for optimal results and conduct a trial run on your design with a small-scale prototype before proceeding to full cut.
2
Step 2: Setting Up the Laser Cutter
To ensure the best outcome cutting with the laser maker, it is very important to do settings accordingly for precision and safety. First of all, pick the most suitable material and check that it has all the properties required for your laser cutter. The most popular ones are wood, acrylic, paper, and some metals. When the material is chosen, the cutting area is to be properly positioned and the material is to be assisted with the machine. It is very important to set the focus of the laser according to the manufacturer’s specifications; this usually involves creating the correct space between the laser and the material.
In this period, a very common inquiry raised is, “What precautions should I take when using a laser cutter?” The most recent safety guidelines suggest that you should for sure use laser protection goggles that are compatible with the particular laser wavelength used by your device, make sure the room has good ventilation for the quick removal of the fumes, and always keep the machine attended while it is working. On top of that, it’s a good idea to test the emergency stop button before you start any work. For cleaning and maintenance, the lens and mirrors should be cleaned regularly to keep the performance at its best.
3
Step 3: Cutting and Engraving
Precision cutting and engraving settings determine the level of results you will get, so it is up to you to make them meet your expectations. The question, “How can I keep the same high standard for my cutting and engraving all the time?” pops up often from the users. The latest data and proper techniques suggest that first the material suitable for your project is to be chosen and it should be made absolutely flat and secured to prevent any slippage under the operating conditions. The laser settings should be optimized in terms of the parameters power, speed, and frequency for the material being used—this information can usually be located in the manufacturer’s guidelines or from well-known online sources. Run your settings on a piece of scrap material that is the same type you are going to use. Also, it is a good idea for you to check and clean the machine’s optics regularly while making sure that the laser beam is well-aligned. Furthermore, it has been observed through search trends that software compatibility is one of the most queried concerns among the users—by making use of the current software together with the right vector files, one will be able to get very precise designs and even clear outcomes with the engraving process. If you continue to pay attention to these factors consistently, then both cutting and engraving operations will, in turn, be kept to a high-quality standard.
4
Step 4: Post-Cutting Finishing
Finishing steps after cutting is an operation that is mandatory to increase the quality and the presentation of the final product. The first thing to do is to clean the edges of the material thoroughly so that no residue or burn marks left behind during cutting are seen. A sanding process is to be minimally done on wood or acrylic edges as to make them look smoother. Furthermore, you can also consider applying a protective coating to the metal so as to prevent corrosion and tarnishing.
From the most recent search data provided by the search engine users, one of the most frequently asked questions is, “How can laser-cut materials be prevented from discoloration?” You can do this by configuring the laser cutter’s settings for the specific material and thus, diminishing the heating factor that leads to discoloration. Besides, during cutting, you can use masking tape or apply protective films to the material to avoid damage to the piece. Taking off this layer after cutting will uncover clean and flawless results, which will done the aesthetic of the finished project even more.
Troubleshooting Common Issues
🔥
Melting and Charring
Melting and charring are frequent problems faced in the laser cutting process and they are often the result of not using the right settings or the wrong material combinations. In order to get good results with the laser cutting machine, it is important to correctly setting both power and speed according to the type and thickness of materials. If you are cutting materials that are easy to melt (like plastics), a good approach is to use slower power and faster speed to get lower heat exposure times. Wood materials mostly suffer from charring and know that cleanliness in the laser lens and adjustment of focus and air assist settings can blow off the debris more efficiently will also help in reducing charring.
Besides, it is a good idea to ask if your material is suitable for laser cutting and refer to the manufacturers’ guidelines on this issue so that you can avoid complications at all.
✂️
Inconsistent Cuts
The very first among all the different reasons that can lead to the issue of inconsistent cuts laser cutting is different surface heights or wrong material placements. It is really crucial for the cutting bed to hold the material absolutely flat and to have no clamps or any other kinds of supports blocking the way of the laser beam. Moreover, the focus of the laser cutter’s beam may sometimes change and this will lead to the difference in the quality of the cut. Make it a point to calibrate your laser cutter on a regular basis so that the same focus is received by the whole workspace.
Another factor could be the wear and tear of your machine components, such as the laser lens or mirrors. Dirt, residue, or scratches can alter the beam’s intensity, causing irregular cuts. Maintaining and cleaning these components regularly is essential to ensure consistent performance. Lastly, improper speed and power settings for the specific material can result in uneven cuts. Always refer to the manufacturer’s recommended settings and run test cuts to fine-tune adjustments for optimal results.
📏
Material Warping
Material warping is a frequent challenge during laser cutting and engraving, which can dramatically change the quality of a finished product. Whenever thin woods, acrylics, or plastics are cut, or those materials are not even but are subjected to high temperatures, the warping is from the expansion of the material, which was not uniformly distributed across the entire area.
Using correct speed and power settings based on the material of the cutting is one way to limit the warping of the material. So, for instance, if you are using a material that easily gets damaged by heat, a preferable strategy would be to combine low power levels with fast cutting speeds so that the laser’s heat effect is reduced. Another way to hold the material flat during cutting process is by securing it tightly to the bed with various clamps or weights. The cutting beds made of honeycombs are becoming more popular, because they not only facilitate airflow but also help in drastically decreasing heat build up beneath the material, thus, very effectively combating warping. Regular testing and adjustment will ensure that you achieve precise and accurate cuts while maintaining the material’s integrity.
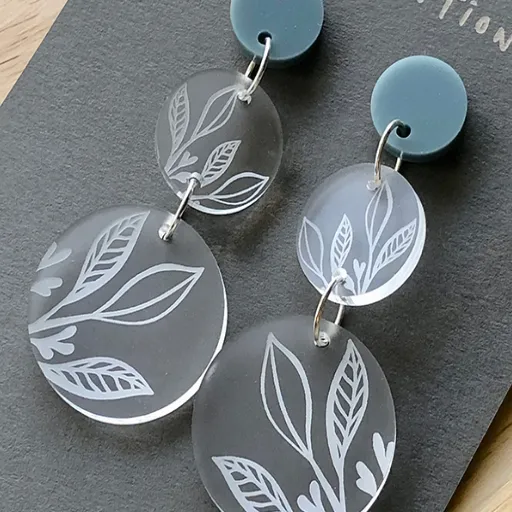
Creative Applications of Laser-Cut Acrylic and Plexiglass
Frequently Asked Questions
Q
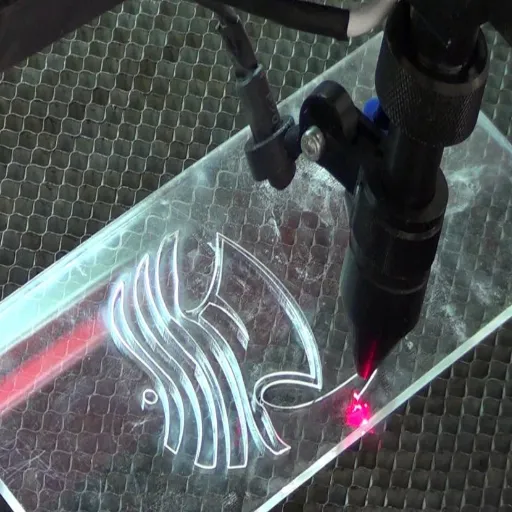
What type of laser is best for cutting acrylic?
Usually, a CO2 laser cutter is the best choice to cut acrylic. Such lasers cut primarily via the heat emitted by the laser beam which is mainly absorbed by the acrylic, thus melting it down to create a nice and precise cut line. In most cases, these types of lasers are perfect for creating perfect lines and sharp edges on acrylic. The procedure of choosing the laser cutting machine should include knowing the thickness of the acrylic for which the machine power will differ. Also, be sure that the cutting machine has settings that can be changed to cater for the cutting speed and quality you want.
Q
Can I use a diode laser for acrylic cutting?
It is possible to cut acrylic with a diode laser, but the efficacy will depend on the thickness of the acrylic. The power output of a diode laser is usually less than that of a CO2 laser, hence the diode has trouble cutting thicker acrylic sheets. However, thin acrylic of a clear color can be a good option for the diode laser or it could also be used for engraving. If the diode laser cutter caster is doing the job, it is best if a sample of the acrylic to be cut is used toying with cutting parameters. Cleaning the acrylic surface is a good practice as it makes the process smoother and more effective.
Q
What is the cutting process for laser cutting acrylic?
Laser cutting acrylic entails a process that consists of several stages, the main ones being design preparation, and laser cutting and engraving. Initially, you should have your design ready in a vector file compatible with the laser cutting machine. After the design has been completed, the acrylic sheet must be positioned securely on the cutting surface of the machine. The cutting laser will track your design by emitting rays of light at its powerful setting. The plastic will be cut with the utmost precision and the laser settings must be adjusted according to the thickness of the acrylic being worked with. It is also common to cut and engrave your acrylic projects for extra intricacy.
Q
Can I cut plexiglass with a laser cutter?
A laser cutter can be used to cut plexiglass, and it might actually let you avoid the disadvantages of traditional cutting methods being that it can be a great alternative to them. Plexiglass is acrylic, and that’s why many laser cutting machines can effectively cut its layers down if only the right settings are applied. It is necessary to take time and effort in selecting the right cutting parameters, such as power and speed, when using a laser to cut plexiglass in order to have edges that are clean. In addition, using a piece of scrap to test before starting with your project is smart so that you can make any adjustments.
Q
What thickness of acrylic can I cut with a laser machine?
The acrylic thickness that a laser machine can cut is determined by laser power and the type of acrylic used. One inch thick acrylic can be cut by CO2 laser cutters easily, however, diode lasers with lower wattage would only be able to cut the acrylic that is generally thinner than ¼ inch. For thicker acrylic materials, under high laser power, a slower cutting speed would be required for optimum results. It is always good to check the specifications of your laser cutting machine and look for the recommendations concerning the specific acrylic you want to use thus you will be sure about the maximum thickness to cut.
Reference Sources
1
Carnegie Mellon University: 99-353 SolidWorks and Laser Cutting Working With Acrylic
This document provides detailed insights into working with acrylic sheets, including specifications and practical tips.
2
University of Pennsylvania: Cutting Parameters
This page discusses the ideal properties of acrylic for laser cutting and offers practical advice on achieving clean cuts.
3
Louisiana State University: Laser Cutter Manual
A comprehensive manual covering recommended materials, including acrylic, and best practices for laser cutting.