The advancement of technology in the form of laser cutting has transformed how materials can now be worked upon. Plywood is renowned and widely used because of its low cost, ease of use, and beauty. A professional or an amateur will tell you that manipulating plywood with a laser cutter like a cnc machine gives endless creative opportunities, and this guide helps provide handy tips and advanced strategies to achieve clean cuts, avoid mistakes, and get the most out of your laser cutters. From the different types of plywood and their uses to the settings on the laser cutter, we cover everything to help you take your projects to a higher level.
What is Laser Cut Plywood, and How Does it Work?
Laser-cut plywood indicates any sheet of plywood which has been cut or engraved with a laser cutter. Laser cutters have the ability to cut or engrave designs on wood with great precision. These machines cut using a laser, which heats and vapourises the wood along a path. The use of a laser cutter leads to superior results because plywood, being a composite of thin veneers of wood glued together, responds to laser cutting. Users of a laser cutter have full control over the parameters of the laser cutter, such as speed and power, making it a versatile machine for cutting furniture, signs, detailed art, and even prototypes.
Understanding the Basics of Laser Cut Plywood
This comprises utilizing a laser-cutting machine that etches or slices designs on plywood sheets. Its beam vaporizes the material, which, in turn, results in clean, deep cuts. Here is what you need to know:
- Material: Plywood is a multi-tiered wooden product that comes with a channel and can be found in numerous grades and thicknesses. Always go for plywood like birch or basswood that’s appropriate for laser cutting and yield smooth and clean cuts.
- Settings: The laser’s speed and energy must be modified to the thickness of the plywood. Thicker sheets require more power, whereas a lower power is suitable for engraving.
- Designs: It is possible to create multifaceted and even intricate designs as laser discriminately etches, allowing it to be used for toys, bespoke furniture, and even architectural models.
- Safety: Ensure there’s proper ventilation as smoke and gas might be produced while cutting plywood. Also, make use of laser-safe plywood otherwise harmful chemicals would be released.
- Applications: Some of the more prominent include securing custom designs, displaying signage, and crafting decorative pieces like prototypes.
This technique is renowned for its versatility and efficiency as well as the fact that it can cut intricate designs at lightning speed.
Types of Lasers Used in Plywood Cutting
Plywood can be cut with lasers, and the two types used the most are:
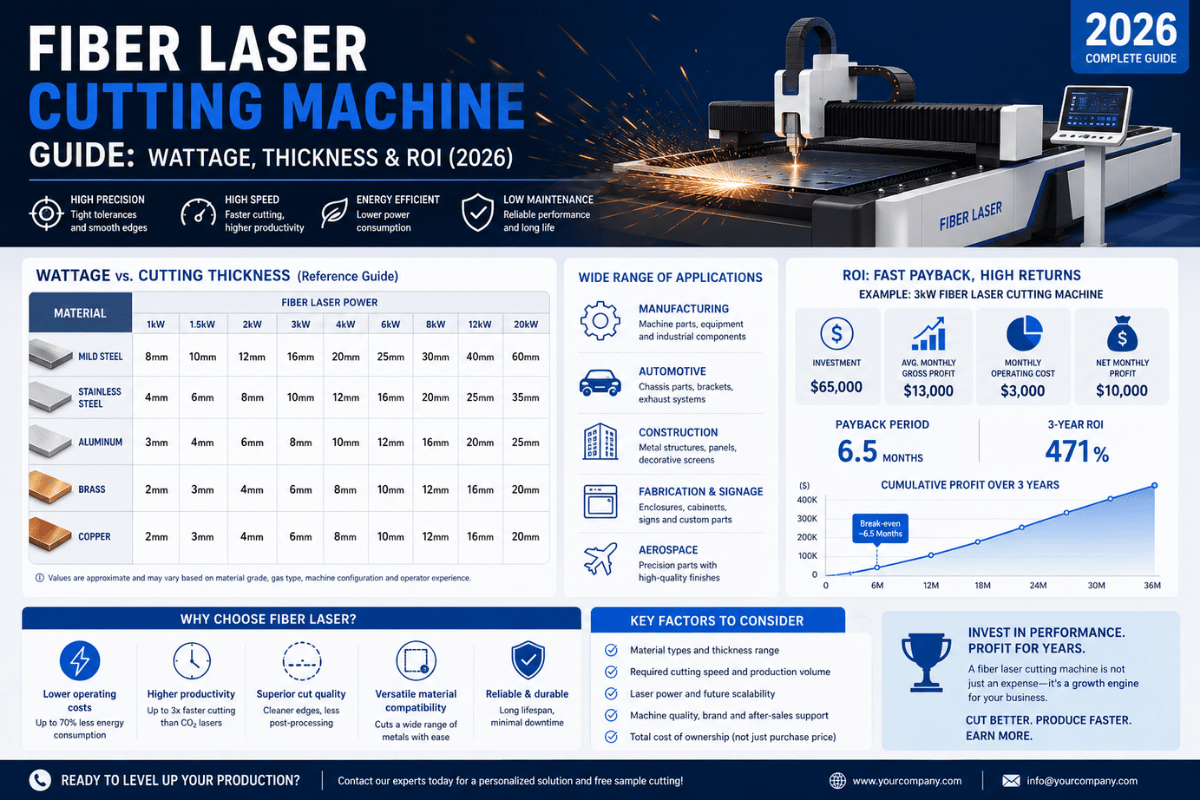
- CO2 Lasers: The most popular among the lasers best suited for cutting plywood. They have great power and can accommodate different thicknesses of plywood from 3mm-20mm depending on the laser’s wattage, which can range anywhere from 40W-150W. CO2 lasers are most suited for cutting as they do it cleanly and with minimal burning.
- Diode Lasers: These are equipped to handle thinner plywoods. Great for beginner hobbyist laser cuts or small scale projects but are limited to 10mm thick plywood. Less powerful than CO2 but still performant when used properly.
Fiber lasers are best used for metal and not wood, so because of this they are not recommended for plywoods since they will burn the wood or create poor quality cuts.
How Laser Cutting Machines Work with Plywood
Lasers can be used to etch, engrave, or cut plywood sheets using a beam of laser light as the primary tool due to its precise nature. The following accounts the important fundamental steps involved in such a process:
- Creation of Laser Beam: As previously stated in the introduction, the basis of the process is a laser cutter – generally a CO2 laser is used, which derives its name from the gas used within it. This type of gas laser is quite efficient for cutting organic materials like wood as well as plywood.
- Focusing the Beam: The condensers and mirrors enable transmission of laser light, also they aid in conversion into a tight beam of light. This tighter concentration allows for slicing through the board or any desired engraving.
- Interaction with Materials: When the suggested laser beam is placed under contact with the wood, the beam creates heat strong enough to combust and devour it. The incandescence quality determines if the laser will cut or drill holes into it or just shave the top.
- Adjust control: Every laser cutter is attached to programmable software which stores range of cutting or engraving patterns making them repeatable. Such features ensure that the exact measures of spacing, depth and position of wear are configured.
- Safety: Venting Units: Every single advancement in technology bears mistakes as of recently discovered, be it during engraving or cutting the wood required laser cutter creates waste, Zero-Oxygen-Residual Smoke aka dorcs, toxic products like snap, fire, ridiculous smoke and rubble. Automated table saws are enabled with special traps designed for the removal of such remnants along with ensuring a clean environment.
- Material Considerations: As defined, plywood consists of several layers of wood veneer glued together. The type of plywood as well as its thickness and the glue used can affect the cutting process. For example, plywood designed with formaldehyde free glue is preferred for laser cutting due to lack of harmful fumes.
Due to their high accuracy and flexibility, laser cutting machines are commonly used in making custom designs, prototypes, and other projects involving detailed work on plywood.
Choosing the Best Plywood for Laser Cutting

Factors to Consider When Selecting Plywood for Laser Cutting
Selecting the correct type of plywood is essential for ensuring precision and quality in laser cutting projects. The ease of processing and the final outcome of the work depends a lot on the type of plywood chosen. The following hints should be incorporated in decision-making:
1. Plywood Type
The selection of a particular type of plywood usually depends on the core type of material and the number of veneer layers. For laser cutting, birch plywood is one of the most commonly used types because of its consistent grade and very few voids. Construction-grade plywood should be avoided as well because it contains a lot of knots and fillers that affect the overall cutting process and results in excessive ragged edges.
2. Thickness
Thickness affects the ease and effectiveness with which lasers can cut through materials. Laser cutters are most effective on thin (1/8 inch or 3mm) to medium (1/4 inch or 6mm) thick plywood. Thicker plywood may require a higher powered laser which could result in burning or incomplete cuts.
3. Glue Type
The type of glue used to hold together the different layers of plywood is important. For best results, the plywood should contain laser-safe glue. Plywood containing excessive resin or hazardous chemicals tends to produce very hostile emissions.
4. Surface Finish
The surface finish of plywood determines its effective utility visually as well as mechanically after cutting. Cleans and smooth surfaced plywood yields an edged finish, while rough surfaced plywood results in uneven edges due to splintering. Depending on the project specifications, also assess whether a clear or pre-finished surface will do.
5. Void and Grain Uniformity
To maintain structural integrity during cutting, high-grade plywood should have very few voids in its layers. Voids and inconsistencies can have an effect on the accuracy of laser cuts. Aesthetically pleasing and less flawed plywood contributes to better structural grain consistency.
6. Moisture Content
Moist hinders the efficiency of laser interaction with plywood. Thus, the best outcome is achieved by using dry plywood. Use proper storage for the plywood to maintain its dryness, avoiding warping or dampness.
7. Application-Specific Needs
The final product requirement should be a stand-alone consideration when choosing plywood. For instance, thin plywood is best suited for decorative works, while thick and strong plywood excels in structural applications.
Evaluating these points will help you ensure the most quality and performance in your laser cutting projects. Always run a test on the laser cutter before a full scale project to assess material applicability.
Why Birch Plywood is Popular for Laser Projects
It is no wonder Birch plywood has become a common material used for laser cutting projects. Here are some reasons to consider Birch plywood for your next project:
Highlights include:
- Durability: Birch plywood is manufactured from several layers of veneer so it possess great strength and stability. Due to its remarkable durability, birch plywood allows for precision cuts during laser cutting without the risk of cracking or warping.
- Sanding Ease: The engraving and cutting of birch plywoods surfaces is made all the more easier owing to the fine and even patterns on it which guarantee smooth surfaces. This results in sharper edges eliminating the tedious requirement for additional polishing or finishing.
- Construction and Cost Balance: Compared to solid wood, Birch plywood is far more cost efficient. Its accessibility to a vast range of projects does not compromise on its quality, making it budget friendly.
- Consistent Measurements: A requirement in laser cutting is the accuracy in the thickness of plywood, which is consistent in birch plywood, ensuring accurate outcomes across multiple projects.
- Minimum Sap/Resin Content: Elm plywood features very low amounts of sap or resins which minimizes the chances of burns or scorch marks through laser cuts. These factors increase the plywoods professional appeal due to its cleaner edges.
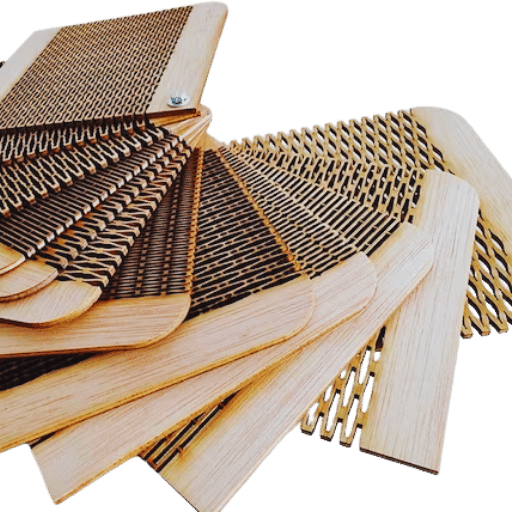
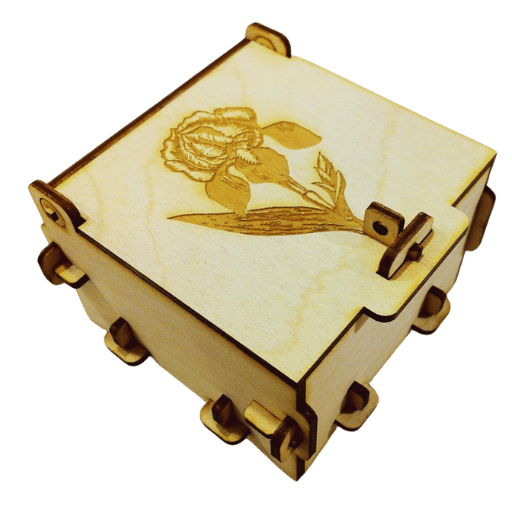
Typical Applications in Laser Projects:
- Commercial and business signs, respectively.
- Complex 3D models and sculptures.
- Unique Coasters or Ornaments.
- Customized presents or engraved metal artwork.
Birch plywood is readily available, inexpensive, and demonstrates durability and a smooth finish. Therefore, it has become one of the most practical materials for creating professionally looking laser-cut projects. It is to be expected that this material would perform well for such applications.
The Advantages of Baltic Birch in Laser Cutting
The remarkable qualities of Baltic Birch plywood make it a widely chosen material for laser cutting. Below, we outline its key advantages that make it an ideal choice for intricate and high-quality laser-cut projects.
1. Durability and Strength
Latvia and Russia are famous for their physically strong Baltic Birch wood. Its multiple veneer layers are cross-bonded resulting in high strength and resistance to warping. This characteristic ensures that your laser cut designs retain their integrity over time.
2. Surface Smoothness
Such surfaces, after being sanded, provide a Baltic Birch that is smooth, which enhances laser precision. This ensures clean cuts and guarantees that engraving is done effortlessly without hindering functionality and beauty. Baltic Birch can be used to create both functional parts and decorative engravings.
3. Consistent Thickness
One of the standout features of Baltic Birch is its uniform thickness. Unlike other types of plywood, this ensures predictable cutting depth, reducing errors in the cuts made and thereby increasing the overall accuracy of cuts.
4. Minimal Voids or Gaps
Unlike standard plywood, Baltic Birch has fewer internal voids, making it more durable. This uniformity allows for these pieces to establish a uniform edge with fewer gaps, which, as emphasized before, is ideal for intricate design work.
5. Different Uses of the Material
The Baltic Birch wood due to its strength, smoothness, and reliability, can be used for laser-cutting furniture components, signage, art pieces, puzzles, and intricate sculptures. The wood can be used for projects that are both structural and aesthetic, owing to its stability.
Suggestions to Improve Outcomes
- To avoid charring of Baltic Birch edges, use laser settings specifically programmed for the wood.
- Ensure proper ventilation to avoid smoke marks while cutting.
- For larger projects, to maintain consistency and quality, Baltic Birch wood should be purchased from recognized suppliers.
Baltic Birch plywood is ideal for laser cutting because of its unmatched durability, precision, and reliability. These features aid sculptors of different skill levels in excelling in projects of all shapes and sizes.
What Type of Laser Cutter is Best for Plywood?
The Role of CO2 Lasers in Plywood Cutting
The precision, effectiveness, and adaptability of CO2 lasers greatly benefit the cutting of plywood. Let us take a closer look:
- Accuracy And Clean Cuts: The use of CO2 lasers allows for accurate melting and vaporization of plywood, resulting in intricate designs and smooth edges devoid of burn marks.
- Compatibility: All types of plywood like birch, bamboo, and hoop pine of varying thicknesses (up to 20mm depending on power) can be handled.
- Minimal Waste: Material wastage in many industrial applications is significantly reduced with the use of CO2 lasers compared to conventional methods due to the precision in cuts.
- Versatility: CO2 lasers not only engrave but also cut plywood which is applicable in furniture, decorative items, and custom designs applications.
- Effectiveness: Considerable amounts of time are saved along the need for post-processing tasks like sanding or refinishing surfaces.
Comparing Diode and Fiber Lasers for Wood Projects
Below are the key points of note while considering diode verses fiber lasers as it relates to wood projects.
Diode Lasers
- Best for Wood: Diode lasers cut and engrave various types of wood, such as solid wood, plywood, and MDF.
- Material Compatibility: These lasers have high efficiency with organic materials like wood, leather and paper but have difficulty with metals and transparent materials.
- Cost: These lasers are cheaper and best suited for beginners and hobbyists.
- Performance: Slowest and weakest among all lasers. Takes multiple passes to cut or engrave thicker materials.
Fiber Lasers
- Not Suitable for Wood: Fiber lasers are meant for metals and some plastics but perform poorly on organic materials like wood.
- Material Compatibility: Used largely for metals like stainless steel, aluminum, and engineering plastics.
- Cost: Fiber lasers are pricey and impractical for woodwork projects.
- Performance: Best for high-speed and powerful cutting. Limited versatility with non-metal materials.
Conclusion
Diode lasers remains the most versatile and effective for wood-working projects as fiber lasers are ill suited for such tasks since they are specialized for metalwork.
Essential Features of a Plywood Laser Cutter
High Precision Cutting
- Achieves precise and accurate cuts with clean edges, which lessens the need for additional finishing.
Adjustable Settings
- Enables customization of selected power for cutting or engraving according to the thickness of plywood and project requirements.
Large Working Area
- Provides space for different sizes of plywood for a wide array of project scopes.
Efficient Cooling System
- Avoids overheating to maintain reliable performance and prolong the life of the cutter.
Compatible Software
- Allows the use of design software that is compatible with uploading vector files and other formats.
High-Power Laser
- Specialized to enhance productivity through dimpled cutting in dense layers of plywood.
Air Assist System
- Enhances cutting and visibility by removing smoke and debris during operation.
Automatic Recognition Sensors
- Change the type or thickness recognition settings and automatically adjust them to the settings for the selected plywood type and thickness.
Durable build quality
- Uses durable materials designed for reliable and sustained operation.
Safety Features
- Operator safety is guaranteed by interlocks and emergency stop buttons alongside protective enclosures.
How to Cut and Engrave Plywood with a Laser?

Step-by-Step Guide on Laser Cutting Plywood
When laser cutting plywood, special care must be taken to clean the edges and ensure the cutout is precisely contoured. The following tasks should be followed:
Choosing the Right Plywood
- Select plywood intended for laser cutting. They must not contain large voids, layers must be as uniform as possible, and resin content must be low. This is to ensure there is no irregular cutting or burning at the edges. Birch plywood or basswood plywood are common choices.
Preparing the Design File
- Import or create the relevant design in vector graphics software like CorelDRAW or Adobe Illustrator. Make sure the design is encoded as vector paths because the laser will be navigating along these paths and cutting them. The file should be exported in DXF or SVG format.
Calibrating the Laser
- Depending on the thickness of plywood, parameters like speed, power, frequency, or even a combination of these need to be adjusted. The starting point assumptions should be based on the manufacturer guidelines for the specific machine. These settings should also be validated on some scrap pieces first.
- Lowering power and increasing speed for thin plywood (around 3mm) tends to avoid overheating.
- Thicker pieces require the inverse settings.
Safety & Proper Airflow
- Always make sure that the exhaust system connected to the laser cutter is in proper working condition before use, as it needs to remove any fumes produced during cutting. A set of goggles must be worn at all times, and the operator must not take their eyes off the apparatus while it is running.
Affix the Plywood on the Cutting Bed
- Position the plywood on the laser cutter bed in a flat position so no uneven cuts are made. Make sure it is alignment-compliant and tightly fastened to avoid any movement throughout the cutting process.
Make a Focus Adjustment
- For each material thickness, calibrate the laser focus. A lot of machines come with the option of manual focusing and automatic focus systems. Proper focus guarantees accuracy in cutting.
Test Cut
- To assess settings, an initial test cut should be made at the corner of the plywood. The edges should be clean, and the cut should go through fully; if not, adjust the settings until they do.
Conduct the Laser Cutting
- After all settings are met, start the laser-cutting process. Throughout the entire operation, observe to maintain consistency and resolve any arising issues promptly.
Post Clean Up and Check of the Product
- Post removal of plywood from the machine, check if the edges are cut satisfactorily. If found worse than expectations, employ light sanding to edges to clear out residue or minute fragments.
Competing the Parts or Storing Them
- As the parts are prepped for an elaborate project, store them in a secure space where they won’t get damaged. Alternatively, commence assembly for the project.
By following these sequential steps, laser cutting of plywood will be accurate and efficient, thereby ensuring quality and reducing wastage.
Laser Engraving Techniques for Plywood Projects
Laser engraving plywood can generate intricate, professional-grade designs that can be used across numerous applications. However, to achieve the finest outcomes, it is necessary to know the material and observe certain methods. Here, we highlight some of the practical measures to observe for accuracy and precision.
Tips for Choosing the Right Plywood
It should be clear by now that not all types of plywood are the same. Pick the one that is best suited for laser engraving. Consider the following.
- Selecting plywood compatible with laser engraving: Check to see if the plywood is classified as “laser-grade” or “engraving-quality” because these are made for better quality engraving.
- Confirm veneer thickness: Veneers with thicker layers provide better results in engraving, as they are less prone to chipping and scorching.
- Stay away from plywood with gaps or fillers: Internal gaps and glue-filled layers can cause uneven damages to your laser engravings.
Surface Preparation
In order to get a precise and clean engraving, proper preparation is required. Consider these pointers:
- Clean the surface: Get rid of any possible dust or dirt on the plywood by wiping it with a soft damp cloth. This ensures that the laser works efficiently.
- Mask the surface (optional): During the engraving process, plywood is prone to charring or smoke stains; masking tape can minimize those effects.
- Try testing a small area: Always test your laser settings on a scrap piece of the same plywood to see if there are problems before engraving the actual project that you intend to work on.
Extra Suggestions
- Play around with the designs: For more ornate engravings, lower power combined with slower speeds usually works better. For more simplistic designs, a faster method might be more efficient.
- Don’t forget ventilation: It’s always advisable to be in a well-ventilated place while working to get rid of fumes produced during the wood engraving process.
If you adhere to these tips, you will be able to carry out precise plywood engravings that are professional-looking and can be used for different purposes.
Importance of Air Assist in Plywood Laser Cutting
Air assist is important in plywood laser cutting because of the following reasons:
- Cuts with Cleaner Edges: Significantly lessens charring and smoke marks which helps to produce more accurate as well as smooth edges.
- Improved Efficiency: Further increases the speed of cutting and reduces the number of required passes by getting rid of debris and heat.
- Safety: Reduces the possibility of starting a fire by removing flammable debris.
- Extended Equipment Lifetime: Reduces maintenance as smoke and debris do not obstruct the laser lens.
To summarize, air assist improves the quality, efficiency, and safety of laser cutting.
Common Mistakes to Avoid with Laser Cut Plywood

Preventing Burn Marks on laser-cut plywood
In order to avoid scorch stains on plywood that is laser etched, consider these handy tips:
- Apply Masking Tape: To prevent burn marks on the surface of plywood, apply masking tape before cutting.
- Modify Laser Settings: Depending on whether the plywood is thin or thick, adjust the power and speed settings accordingly. The chances of burn marks appearing can be reduced with lower power and higher speed settings.
- Turn on Air Assist: Confirm that the air assist is working because it helps remove debris and cools the laser, preventing intense heat from causing burns.
- Use Good Quality Material: Plywood that has a low glue content burns less and cuts more cleanly, so be sure to use better quality materials.
- Do Test Cuts: Refine your settings on sample pieces to ensure that the cuts leave behind minimal marks before proceeding to the final workpieces.
With these methods, burn marks will be reduced significantly, and the quality of laser cuts will be greatly improved.
How to Avoid Warping in Plywood Sheets
Warping of plywood sheets can happen due to moisture content imbalance, improper storage, or other environmental factors which can lead to deformation that makes the material unusable. To avert warping, consider the following methods:
Proper Storage
- If horizontal storage is not viable, then vertical storage can be employed, but ensure that the sheets are supported along their edges so that sagging does not occur over time. Store the sheets horizontally on a level surface where weight can be channeled uniformly so that stress on the material is reduced. Ensure that the area where storage is done is dry and well-aerated to limit the chances of moisture build-up.
Maintain a Controlled Environment
- Plywood is vulnerable to temperature and humidity changes. Ensure that those parameters are kept stable around 40% to 60% relative humidity and 60 to 80 degrees Fahrenheit. In cases where there is too much moisture, the air is regulated with the help of dehumidifiers to protect the sheets.
Sealing and Finishing
- A sealant or wood finish can be added to the plywood edges and surfaces to enhance protection from moisture seeping in. For uniform resistance, seal all edges and surfaces so that moisture cannot intrude through the sheet.
Acclimation Period
- Prior to use, allow plywood to climatize to the workspace conditions for no shorter than 24-48 hours. This mitigates the exposure risk of potential warping from humidity and temperature changes. During this period, set the sheets vertically or at a slight angle.
Use of Drying Agents
- Storage spaces can benefit from the addition of silica gel packets or other desiccants. This is ideal in regions with elevated temperature where relative humidity is high.
Ply Thickness and Quality
- Sturdier plywood sheets possess greater resistance to warping; therefore, thicker sheets are preferred due to improved structural sturdiness. Additionally, for best results in warping resistance, select high-grade plywood with low moisture content, usually below 12%, and evenly layered veneers, as poor construction leads to uneven moisture absorption.
Material sciences research indicates that plywood stored in humidified indoor environments retains structural integrity for longer than plywood kept under uncontrolled conditions. Adopting these preventative measures will help maintain your plywood’s flatness, durability, and usability for projects.
Tips for Maintaining a Laser Machine for Plywood Cutting
Optics Cleaning Routine
- Extend cleanings to the mirrors and the laser lens to guarantee correct functioning of the laser as well as to prevent cuts from being inconsistent or material burns from occurring. Follow the provided cleaning solutions and tools set forth by the manufacturers.
Monitoring and Replacement of Consumables
- Routine checks of the protective filters, nozzles and lenses are mandatory and should be done frequently. The precision of cutting as well as the life span of the machine will need the worn out components to be replaced on time.
Proper Ventilation Accessibility
- Professional supervision of the exhaust mechanisms of the machine should be consistently monitored so that smoke and other debris produced during the cutting is expelled out completely. Doing this ensures that material cutting accuracy is elevated while the chances of fire outbreak are simultaneously lowered.
Alignment and Calibration
- The cutting done using the laser needs to be precise and consistent depending on the requirements. In order for these to be achieved, alignment and calibration of the laser beam must be done from the machine’s guidelines on set processes.
Inspecting Mechanical Parts
- Dealing with moving parts such as the slides and the belts requires one to check on their cleanliness and any debris of other contaminants that may have assembled on them. Following the recommended PC activities on the lubricants will ensure that the right measures to be taken against mechanical failure will be executed.
Updating the software
- Compatibility with the new workflows and designs depends on visiting the devices regularly to check for updates to their software. Outdated software will stall the evolution of features available and the functionalities of the laser machine.
Following the practices highlighted above guarantees maximum efficiency and a prolonged life span for plywood laser cutters.
Frequently Asked Questions (FAQs)
Q: What is laser cutting and engraving, and how does it work on plywood?
A: Laser cutting and engraving entails using the focused beam of light to cut and etch materials. For plywood, a CO2 laser machine is the go-to. The laser is able to vaporize wood fibers for each carving, leaving an engraved space, cut-out, or precise mark on the wood. In case you need assistance on getting the best results, this is the all-encompassing guide on laser cutting plywood.
Q: What is the most suitable plywood and the appropriate machine for plywood laser cutting?
A: The ideal plywood for laser cutting is paskrut birch, or maple, as they have greater consistency in density and lower chances of voids. In terms of the appropriate machine, a CO2 laser cutter with 40 watts is ideal for cutting plywood most laser attachments cannot reach 1/4 inch thick. In this article, I will elaborate on choosing the appropriate combination of plywood and machine to best suit your needs.
Q: What methods can be employed to ensure precision when laser-cutting plywood?
A: Precision laser cutting of plywood can be achieved by following these tips: 1) Choose the best quality plywood, 2) Use the right settings of laser power and speed for the thickness of plywood, 3) Set the laser beam to the correct focus distance, 4) Blow the debris away using air assist while cutting, and 5) Perform test cuts. These techniques will result in the desired cuts without having to achieve any additional work.
Q: What measures should be put in place to guarantee safety when a laser is used for cutting plywood?
A: When using a laser cutter, safety measures are a priority. As a standard practice, always have laser protective eyewear on, make sure there is enough ventilation to remove the fumes, never leave the machine running while out of sight, keep a fire extinguisher near, and make sure you are very well grounded. Also, learn the emergency stop button for the machine before starting so that you can instruct it to stop at any given moment.
Q: Is it possible to cut all types of plywood using a laser cutter?
A: Most types can be cut to size, but some types of plywood are more appropriate than others. Avoid using laser for the cheaper plywood that has high resin content or those with toxic adhesive. Baltic birch plywood is said to be the best for cutting plywood due to the consistent core with small voids. Always remember to check the material compatibility with your laser machine prior to cutting.
Q: What are the most recurrent issues with plywood laser cutting, and how might I steer clear of them?
A: Some of the main issues with plywood cutting come from poorly designed and set machines or bad materials. These consist of cuts not going through completely, burns that are too deep, or melting of edges. To ensure that these problems do not arise, make certain that the material is flat and fastened correctly, make sure the focus distance is centered, adjust power and speed settings, and use air to assist with the cooling of the cutting region. Keeping the laser machine clean also cuts down on problems that could arise.
Q: Are laser engravers capable of cutting plywood, or do they only engrave?
A: For engraving machines, their main intended purpose is engraving and some etching; however, some options may also include cutting some thin plywood sheets. Their capability in that regard is generally weaker than a pure laser cutter, though. If you wish to create both cuts and engravings, you’d be better off getting a model designed for both to get more details on what you want.
Q: What software should I procure for the design and execution of laser-cut plywood jobs?
A: The creation of vector artwork for laser cut plywood projects is typically done using Adobe Illustrator, CorelDRAW, or Inkscape. To execute the cuts, you’ll need software that translates your design into machine language for your laser cutter, like Lightburn or RDWorks. Most laser cutters include some proprietary software. If you are just starting out, I recommend starting with simpler programs and then trying more complex software as you learn what works best for you.