Understanding Paper Pulp Fundamentals

What is Paper Pulp?
Paper pulp represents a fibrous material created by breaking down raw materials—wood, recycled paper, or plant fibers—into cellulose components. This versatile substance serves as the foundation for paper production and extends far beyond traditional uses into crafting, packaging, and eco-friendly construction materials.
Key Benefits of Recycled Paper
- ♻️ Environmental Impact: Reduces waste and conserves natural resources significantly
- 💧 Energy Efficiency: Uses less water and energy compared to virgin paper production
- 🎨 Creative Textures: Offers unique textures and colors for distinctive handmade projects
- 🌍 Market Appeal: Attracts eco-conscious consumers seeking sustainable products
📊 Critical Ratio for Success
Optimal Paper to Water Ratio: 1:3 to 1:4
This ratio ensures smooth blending without equipment clogging while maintaining workable consistency
Essential Materials & Tools

💡 Pro Tips for Paper Selection
- Best Choices: Office paper, newspaper, cardboard (uncoated)
- Avoid: Heavily coated, wax-treated, or metallic papers
- Trending: 100% post-consumer recycled paper for eco-authenticity
- Texture Enhancement: Mix packaging scraps for visual interest
Step-by-Step: Creating Perfect Paper Pulp

Making Paper Pulp from Recycled Materials
- Collect Materials
Gather newspapers, office paper, or packaging scraps. Prioritize post-consumer recycled materials for sustainability. - Prepare Paper
Tear or cut paper into small, uniform pieces for faster moisture absorption and smoother pulp. - Soak Thoroughly
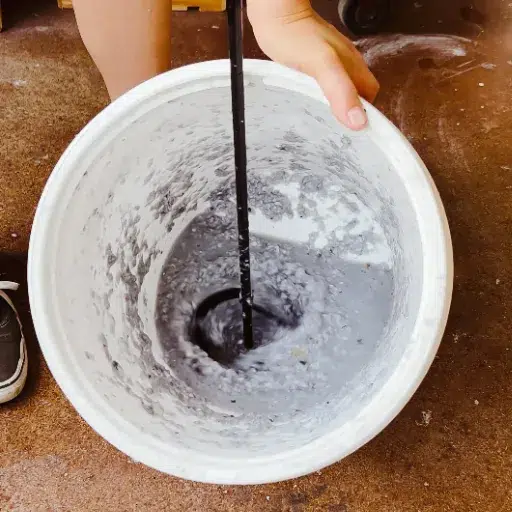
Submerge paper pieces in warm water. Optimal soaking time: 4-6 hours (overnight for cardboard). - Blend to Perfection
Transfer to blender and work in small batches for 30 seconds to 1 minute until smooth and lump-free.
🎯 Achieving Perfect Consistency: Expert Guidelines
Creative Paper Pulp Recipes

Classic Paper Mache Pulp
Ingredients:
- Old newspapers or scrap paper
- Warm water
- Natural adhesive (white glue, flour paste, or PVA)
- Optional: Salt (mold prevention), cornstarch (texture)
Ideal Ratio: 1:4 glue to pulp for optimal strength and flexibility
Paper Mache Clay
Perfect For:
- Intricate detailing and sculpting
- Smooth, refined surfaces
- Durable, lightweight finishes
- Professional-quality results
Advantage: Can be shaped, molded, and sanded—a practical alternative to plaster
Custom Variations
Enhancement Options:
- Texture: Add recycled newspapers for roughness
- Strength: Blend cardboard for sturdier pulp
- Smoothness: Use cotton or linen fibers
- Decoration: Mix in petals, glitter, or natural dyes
Advanced Crafting Techniques

Working with Molds and Moulds
Molds provide structured support for shaping pulp into various forms, from flat sheets to intricate three-dimensional designs. The technique involves evenly applying pulp to the mold or compressing it into desired shapes.
✨ Techniques for Smooth Surfaces
- Extract excess moisture carefully during shaping
- Use a moist sponge to finish surfaces before drying
- Choose silicone molds for flexibility and easy extraction
- Consider nature-inspired molds (leaves, shells) for artistic quality
Mixing Pulp with Clay
Combining paper pulp with clay creates a soft, pliable material that accepts detailed forms. The pulp infuses clay with natural patterns and fibrous texture, enhancing tactile quality while maintaining eco-friendliness.
Trending Application: Artists and hobbyists experiment with pulp-to-clay ratios to create unique, textured pieces aligned with modern sustainability trends.
Practical Application Guidelines
🌟 Drying & Finishing Excellence
Drying Best Practices
- Even Thickness: Ensure uniform thickness across the piece for consistent drying
- Ventilation: Place in well-ventilated areas with fan circulation
- Temperature Control: If using oven, keep below 200°F (93°C)
- Patience: Allow natural drying time—larger pieces require extended periods
Finishing Techniques
- Sanding: Smooth rough edges with sandpaper after complete drying
- Priming: Apply primer before painting for even surfaces and vibrant colors
- Sealing: Use clear varnish or eco-friendly sealants for moisture protection
- Waterproofing: Essential for functional pieces like home décor or wearable art
📦 Storing Leftover Pulp
| Method | Duration | Key Benefit |
|---|---|---|
| Airtight Container | Short-term (1-2 weeks) | Prevents drying and contamination |
| Frozen in Portions | Long-term (3-6 months) | Maximum longevity and convenience |
Pro Tip: Squeeze out excess moisture before storing to prevent mold growth
⚠️ Common Mistakes to Avoid
❌ Excessive Water in Mixture
Problem: Creates overly soft consistency that’s difficult to work with
Solution: Add water gradually until reaching pliable but firm consistency
❌ Improper Storage
Problem: Leads to mold growth or wasted materials
Solution: Freeze unused pulp in small portions for eco-friendly, long-term storage
❌ Neglecting Surface Preparation
Problem: Poor bonding on unclean or greasy surfaces
Solution: Thoroughly clean and dry base before starting projects
❌ Rushing the Drying Process
Problem: Hairdryers and excessive heat cause cracking or warping
Solution: Allow natural drying for stronger, smoother surfaces
Frequently Asked Questions
Q: How can I make paper mache with paper pulp?
Soak newspaper or toilet paper strips in water overnight. Blend into fine pulp, then mix with a flour-water paste for adhesive properties. Add a small amount of joint compound for increased durability. Apply to forms or construct figures, allowing complete drying for a solid surface.
Q: What is the best paper clay recipe?
Mix equal amounts of paper pulp and joint compound. Soften paper in water, blend until smooth, then combine with joint compound. Add flour for thickening and work until pliable. This recycled paper clay is perfect for molding and shaping. Allow complete drying for serious durability.
Q: Can I use flour to make paper mache mixture?
Yes, flour is one of the most popular materials. Mix flour and water to create smooth, thick paste that acts as glue for paper layers. Add a pinch of salt to prevent mold during drying. Apply treated paper strips to your chosen mold in layers, then allow complete drying.
Q: How do I use a mold with paper pulp?
Prepare pulp by soaking and blending paper strips. Layer pulp mixture inside the mold, ensuring consistency throughout. Compress pulp to fill hollows and clarify patterns. Allow first layer to dry before adding more, or build up multiple layers. Once thoroughly dried, carefully remove from mold for new forms and patterns.
📚 Reference Sources & Further Reading
Authoritative Resources
📖 Biermann’s Handbook of Pulp and Paper: Volume 1
Focus: Raw Material and Pulp Making
Coverage: Comprehensive guide to traditional and modern pulping processes, including industrial and educational applications
Ideal For: Advanced crafters seeking technical understanding of pulp production
🎨 Exploring the Teaching of Artistic Forming Using Pulp Materials
Platform: IEEE Xplore
Focus: Pulp materials as artistic creation medium and art education applications
Ideal For: Educators and artists exploring pedagogical approaches to paper pulp crafting
🌍 Paper, Pulp, And Place: Investigating Connections Through Process Art
Platform: Digital Commons
Focus: Artistic and educational applications emphasizing process art and sustainability
Ideal For: Eco-conscious crafters interested in the environmental and philosophical aspects of paper pulp work
Why These Resources Matter
- Technical Foundation: Understanding pulping science enhances creative decision-making
- Educational Value: Research-backed methods ensure successful project outcomes
- Sustainability Context: Academic perspectives reinforce environmental benefits
- Innovation Inspiration: Scholarly work reveals emerging trends and techniques
🎯 Quick Reference Card: Paper Pulp Essentials
⚖️ Critical Ratios
Paper to Water: 1:3 or 1:4
Glue to Pulp: 1:4
Water to Fiber: 2-4:1
⏱️ Timing Guidelines
Soaking Time: 4-6 hours (overnight for cardboard)
Blending Time: 30 sec – 1 min
Oven Temp: Below 200°F (93°C)
✅ Best Materials
Use: Office paper, newspaper, cardboard
Avoid: Glossy, waxed, metallic papers
Premium: 100% post-consumer recycled
🔑 Success Formula
- [1] Small, uniform paper pieces = Faster soaking, smoother pulp
- [2] Proper soaking time = Easy blending, fine consistency
- [3] Controlled blending = Optimal fiber preservation
- [4] Natural drying = Stronger, crack-free finish
- [5] Proper storage = Extended usability, zero waste